When a commercial LCD fails, the visible symptom is only the starting point. Flicker can come from unstable power, signal timing, a cable, a source device, backlight control, or the panel electronics. Lines can indicate a source problem, interface problem, connector issue, panel connection fault, or physical damage. "No signal" may not be a display failure at all. A disciplined troubleshooting process separates the display, source, power, interface, environment, and configuration before parts are replaced.
This guide is intended for integrators, retail technology teams, kiosk builders, and B2B buyers working with commercial LCD display screens. It does not replace the service manual for a specific model. Voltage checks, internal repairs, and disassembly should only be performed by qualified personnel using the manufacturer's documentation.
Start With the Symptom, Not With a Replacement Part
The fastest way to waste time is to assume the panel is defective because the screen looks wrong. First describe exactly what the unit does: completely dark, backlight on but no image, "no signal" message, intermittent blanking, full-screen flicker, local lines, color distortion, image retention, random restart, or failure only after warming up.
Record when the symptom appears and whether it follows the display, the media player, the cable, or the location. A good fault report includes display model, source device, interface, resolution and refresh setting, cable path, power source, ambient condition, time to failure, and a photo or short video when appropriate.
If the issue is related to persistent content rather than signal integrity, review the site's article on commercial LCD image retention rather than treating every ghost image as a panel electronics failure.
Use a Layered Troubleshooting Order
A repeatable order reduces unnecessary disassembly:
- Safety and visual inspection.
- Power and startup behavior.
- Source device and output configuration.
- Cable, connector, adapter, and interface path.
- Display input selection and supported signal format.
- Thermal and environmental condition.
- Panel or internal electronics diagnosis.
At each layer, change one variable at a time. If you replace the player, cable, power supply, and display simultaneously, you may restore the picture without learning which component failed.
Symptom 1: The LCD Is Completely Dark
A dark screen can mean no power, failed startup, disabled backlight, a protection state, or an internal fault. Begin with the external power path. Confirm the outlet or distribution circuit is active, the correct power adapter or supply is being used, connectors are fully seated, and no service switch or external control has disabled the unit.
Observe indicator LEDs and startup sounds only if the product provides them; do not assume every model uses the same indicator logic. If the display has an accessible menu or on-screen status, test whether the menu appears without the source connected. A menu can help distinguish "display electronics and backlight are running" from "the unit has no visible output at all."
For integrated products, power architecture may include a controller board, panel, backlight driver, and peripherals. Internal voltage measurement should follow the exact service documentation and be handled by qualified technicians.
Symptom 2: Backlight Is On but There Is No Image
A bright or illuminated screen with no usable image suggests a different fault path. Verify the selected input, source output, cable, and signal format. If the display has multiple inputs, confirm it is not waiting on an inactive port. If the source device supports several resolutions or refresh modes, use a known supported output.
Try a known-good source and known-good cable, one at a time. If the same display works with a laptop but not the installed media player, the investigation should move toward the player configuration or its output path. If multiple sources fail on one input but work on another, the input path may need service.
Bar and stretched displays can have unusual native resolutions. The site's stretched LCD player, EDID, and interface compatibility guide is particularly relevant when the symptom appears after a player replacement or custom resolution change.
Symptom 3: "No Signal" or Intermittent Signal Loss
"No signal" generally means the display is powered but does not detect a usable video input. Check whether the source is awake, whether the correct output is enabled, and whether adapters or extenders are part of the path. Long cable runs, low-quality adapters, connector strain, and incompatible converters can make an installation intermittent even when every component works on a bench.
Intermittent failures should be tested under the same conditions that trigger them. If the screen drops after several hours, a two-minute cold test is not enough. Record temperature, player load, cable movement, and whether the failure follows a scheduled content event or source reboot.
Where possible, remove intermediate devices temporarily. A direct source-to-display test can show whether an extender, splitter, converter, or switcher is involved.
Symptom 4: Flicker
Flicker is a broad symptom. It may be related to unstable power, signal synchronization, unsupported timing, cable integrity, brightness control, panel drive, or thermal behavior. First determine whether the entire image flickers or only a region, whether the on-screen menu flickers too, and whether the problem appears with every input.
If the menu is stable while the video flickers, investigate source and interface timing first. If the entire display including its menu changes brightness or drops out, power, backlight, or internal electronics becomes more likely. Do not ignore environmental temperature: a fault that appears only after the enclosure heats up can point to a thermal or power component issue.
For a new installation, verify the native or recommended resolution and refresh settings from the specific product documentation. Do not force a non-standard mode merely because the source can output it.
Symptom 5: Vertical or Horizontal Lines
Lines should be categorized by whether they are fixed, moving, full-height, full-width, single-pixel, grouped, colored, or related to particular content. Then test whether they appear in the display's own menu. If a line is visible over the menu and every input, the problem is less likely to originate in the media file.
A line that disappears when the source or cable is replaced points toward the external signal path. A persistent line on all inputs may require panel or internal board diagnosis. Physical pressure, impact, connector damage, or flex-cable problems can also create line defects, but internal inspection should not be attempted without the correct service procedure.
Take a high-resolution photo with a plain test pattern. A busy advertisement can hide the structure of the fault.
Symptom 6: Wrong Colors, Washed Image, or Tint
Color problems can result from content, player output range, cable or connector issues, display picture settings, color-management settings, or hardware faults. Reset only the relevant picture parameters according to the product instructions; do not perform an undocumented factory reset on a deployed device because it may erase installation-specific configuration.
Compare the same test image on another known-good display and compare a known-good source on the affected display. This A/B method separates content and source from the display. For multi-screen installations, ensure one unit has not been left in a different picture mode or color-temperature preset.
Symptom 7: Intermittent Reboots or Shutdowns
Unexpected restart is often treated as a software problem, but power and heat should be checked early. Confirm the external supply is rated for the configured equipment, connectors are secure, and the installation is not sharing an unstable circuit with high-load devices. In an enclosure, inspect airflow paths and make sure vents are not blocked by mounting hardware or dust.
If the issue occurs on a schedule, check whether a media player, timer, remote-control platform, or power-management function is intentionally rebooting the display. Collect timestamps from every system before assuming a spontaneous hardware failure.
Environmental Problems That Mimic Hardware Failure
Commercial displays operate inside real environments. Direct sun can increase panel temperature. Refrigerated aisles can create condensation risk. Dust can restrict cooling. A kiosk enclosure can trap heat. Vibration can loosen connectors. Bright ambient light can make a functioning display appear too dim.
For shelf-edge installations, see the guidance on double-sided bar LCD power, cabling, and thermal planning. For outdoor projects, thermal design should be treated as part of the enclosure system rather than a problem to solve after deployment.
Build a Known-Good Test Kit
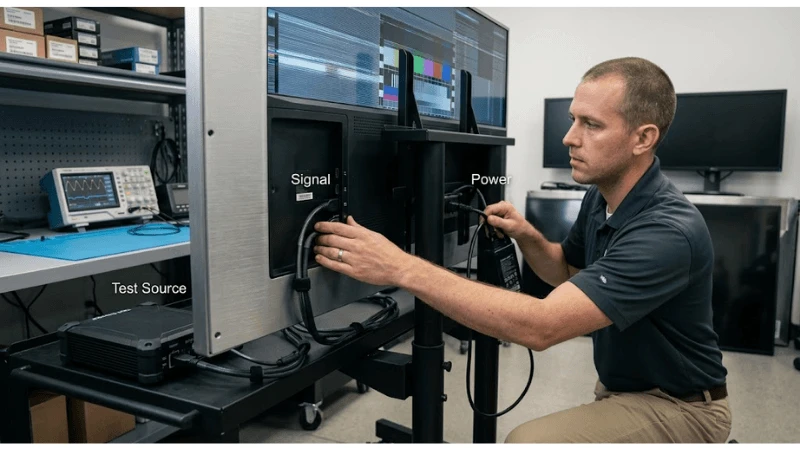
Field teams can shorten diagnosis by carrying a controlled set of known-good components: approved source device, short tested video cable, correct power adapter where serviceable, test media, cable adapters approved for the installation, cleaning materials, and a service checklist. The kit should not become a collection of unknown spare parts.
Label test items and verify them periodically. A "known-good" cable that has been damaged in a tool case can create false conclusions.
Troubleshooting Matrix
| Symptom | First checks | Useful isolation test |
|---|---|---|
| Dark screen | Power source, connectors, status, service switch | Known-good power path and documented startup procedure |
| Backlight, no image | Input selection, source output, signal format | Known-good source and cable |
| No signal | Player state, cable, adapter, input | Direct connection without extender/splitter |
| Flicker | Menu vs video, power stability, timing, heat | Known-good source at supported resolution |
| Lines | Whether visible in menu/all inputs | Plain test pattern plus alternate source |
| Wrong color | Picture settings, source output, cable | A/B with known-good display and source |
| Random reboot | Power, thermal condition, scheduled controls | Timestamp correlation and stable bench test |
When to Stop Field Troubleshooting
Stop when the procedure requires opening a powered enclosure without authorization, measuring undocumented internal circuits, bypassing protection, modifying a power supply, or repeatedly resetting a production unit without preserving configuration. Escalate when there is evidence of liquid ingress, physical panel damage, burning odor, arcing, swollen components, damaged mains wiring, or repeated protection trips.
For a B2B project, define this escalation threshold in the service documentation. Field teams should know which checks are safe, which components are replaceable modules, and which failures require depot or manufacturer-level repair.

Procurement Lessons From Troubleshooting
Fault diagnosis is easier when the product and project are documented well. During procurement, ask for supported input formats, power requirements, installation orientation, environmental limits, service access, diagnostic indicators, firmware/update procedure, and replacement-part strategy for the exact model.
Buyers evaluating a commercial bar LCD display or other custom form factor should also confirm player compatibility and cable routing before installation. A clear acceptance test at commissioning provides a baseline that later troubleshooting can reference.
FAQ
Q: Does flicker always mean the LCD panel is failing?
A: No. Flicker can come from power, the signal source, timing, cable integrity, backlight control, thermal behavior, or panel electronics. Isolate the source and signal path before replacing the panel.
Q: What is the fastest test for a "no signal" screen?
A: Confirm the display input and source state, then test with a known-good short cable and known-good source at a supported signal format. Remove adapters, extenders, or splitters temporarily when practical.
Q: Why do lines matter if they appear in the display menu?
A: If the defect overlays the display's own menu across inputs, it is less likely to be caused only by the media file or external source. That observation helps direct the next service step.
Q: Should a technician factory-reset the display?
A: Only when the product documentation and service procedure support it and the configuration has been recorded. A factory reset can remove deployment-specific settings and make diagnosis harder.
Keep a Fault History for Recurring Problems
Intermittent display problems become much easier to diagnose when the service team can compare events over time. Record the symptom, date, site, operating hours, source device, cable or adapter changes, ambient condition, corrective action, and whether the issue returned. If several screens show the same symptom after the same player or firmware change, the pattern may point away from individual panel failure.
Use the history to separate one-time installation mistakes from repeatable fleet issues. It can also improve procurement: recurring connector strain may justify a mechanical change, repeated heat-related shutdowns may require enclosure redesign, and repeated "no signal" incidents after player replacement may indicate a compatibility-control gap. A fault log is valuable only when the entries are specific enough to support comparison.
Conclusion
Effective LCD troubleshooting is a controlled isolation process. Describe the symptom precisely, start with power and external signal paths, change one variable at a time, reproduce intermittent faults under realistic conditions, and stop before unsafe or undocumented internal work.
If you are selecting a display for a new retail or kiosk project, use troubleshooting lessons during procurement: confirm signal format, power, orientation, thermal design, cable path, service access, and diagnostic workflow. For model-specific integration questions, contact the project team through the LEGOYO inquiry page rather than assuming that one troubleshooting procedure fits every LCD.