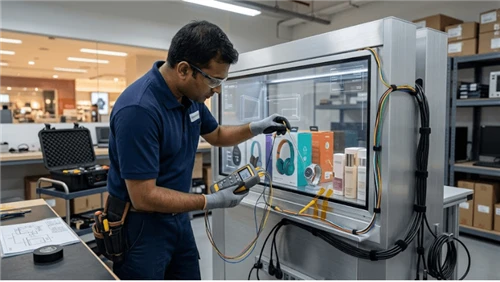
A transparent LCD screen can look completely normal to shoppers and still show dark horizontal bands, flicker, color shifts, or fine wave patterns in a photograph or video. That does not automatically mean the display is defective.
The camera and the human eye do not sample the scene in the same way. Shutter timing, sensor readout, recording frame rate, the LCD pixel structure, showcase lighting, camera distance, and viewing angle can all affect what the camera records. In a complete transparent display case, the screen is also only one part of the optical system.
The fastest way to troubleshoot the problem is to identify the artifact first. Broad moving bands usually point toward a timing or flicker interaction. Fine repeating waves that change when the camera moves are more consistent with spatial moiré.

Why a Transparent LCD Can Look Fine in Person but Bad on Camera
Three mechanisms account for most camera-related problems in transparent LCD installations.
Banding and flicker are usually timing problems
Many cameras do not expose or read every part of the image sensor at exactly the same instant. At the same time, an LCD system or the LED lighting around it may vary in output over a rapid cycle that is difficult to see with the human eye.
When the camera exposure timing interacts with one of those cycles, the image can show horizontal dark bands, changing brightness, partial discoloration, or flicker. Sony describes the same mechanism when cameras operate under flickering LED or fluorescent illumination and notes that changing shutter speed or using supported anti-flicker or variable-shutter functions can reduce the effect. See Sony's camera flicker-reduction guidance.
Moiré is a spatial sampling problem
Moiré usually looks different from flicker. Instead of broad horizontal bands, the image may contain fine waves, colored ripples, grids, or repeating lines.
A transparent LCD contains a regular pixel structure, while a digital camera sensor also samples the image on a regular grid. At certain magnifications and angles, those repeating structures can interact and produce a third visible pattern.
Nikon describes moiré as the pattern created when the camera's sampling structure interacts with fine repeating subject detail. Its guidance also notes that changing camera angle, position, lens, or focal length can alter or reduce the artifact. See Nikon's explanation of moiré and false color.
This distinction is important: changing shutter speed may solve timing-related bands while doing almost nothing to a spatial moiré pattern.
Showcase lighting can be a second flicker source
Transparent LCD photography should be tested as a complete installation rather than as a bare panel.
Many showcases depend on internal LED lighting so that the physical merchandise remains visible behind the digital image. An integrated unit such as a transparent LCD showcase with a wood display cabinet therefore combines the panel, backlight or illumination system, enclosure, content source, and camera-facing glass in one optical environment.
The camera may consequently be seeing more than one time-varying source: the display system and the separate showcase lighting. If horizontal bands change when only the cabinet lighting changes, investigate the lighting before treating the LCD as the fault.
Still Photography and Video Do Not Behave Exactly the Same Way
| Capture type | Common problems | Variables that matter most |
|---|---|---|
| Still photography | Banding, uneven exposure, moiré, false color | Shutter speed, shutter type, camera angle, focal length, distance |
| Video | Moving bands, flicker, brightness variation, moiré, unnatural motion | Frame rate, shutter speed, sensor readout, lighting, camera geometry |
Some cameras also behave differently with mechanical and electronic shutter modes. For supported Sony models, the manufacturer recommends trying a mechanical shutter or disabling electronic front-curtain shutter in certain still-photography flicker situations. This is camera-specific guidance, not a universal requirement for every transparent LCD setup.
For broader hardware and application context, see the overview of transparent LCD display screen solutions.
Diagnose the Artifact Before Changing Settings
| What the camera records | More likely cause | First test |
|---|---|---|
| Broad horizontal dark bands | Shutter/flicker interaction | Change shutter speed while keeping the other variables fixed |
| Bands move or change width when shutter speed changes | Timing interaction | Continue the shutter-speed sweep |
| Fine waves, grids, or rainbow-like patterns | Pixel-grid moiré | Change camera distance, focal length, or angle |
| The pattern changes significantly after a small camera movement | Spatial moiré | Find another workable camera position or magnification |
| Banding changes when showcase lights are switched or dimmed | Lighting flicker | Test the lighting independently |
| Overall image brightness changes with the content | Automatic camera exposure | Lock exposure and white balance |
| Only one camera shows the problem | Camera-specific shutter or sensor-readout interaction | Test that camera separately before diagnosing a display fault |
More than one mechanism can be present at the same time. The useful rule is simple: change one variable, observe the result, and then decide what to test next.
How to Fix Horizontal Bands and Flicker
1. Lock the camera before testing
Automatic exposure can hide the effect of the variable you are trying to evaluate. Begin with a controlled setup whenever the camera allows it:
- lock exposure;
- lock white balance;
- choose the required video frame rate before adjusting shutter speed;
- keep aperture and ISO fixed during a shutter test;
- keep the camera position unchanged;
- play the same content loop;
- leave the display configuration unchanged.
If the project uses a touch overlay or additional cover glass, test the final assembly rather than assuming the bare-panel result will transfer directly. A transparent LCD integrated into a glass cabinet, for example, should be validated in its installed state.
2. Run a shutter-speed sweep
Record several short clips or still images while changing only shutter speed.
- Does the band disappear?
- Does it move?
- Does it become wider or narrower?
- Does its contrast decrease?
- Does nothing change?
If the bands respond strongly to shutter changes, a timing interaction is more likely.
For flicker linked to regional mains-powered lighting, Sony's current general guidance gives 1/50 or 1/100 second as useful starting points in 50 Hz regions and 1/60 or 1/120 second in 60 Hz regions. These values are starting points for flickering illumination, not universal transparent-LCD settings. The usable setting still depends on the camera, display, driver behavior, frame rate, and complete installation.
Some cameras provide fine or variable shutter adjustment. This can help when standard shutter increments move from one visible banding pattern to another without reaching a clean point.

3. Separate showcase-lighting behavior from display behavior
Repeat the same camera test with controlled lighting changes where practical:
- display on + normal showcase lighting;
- same display settings + showcase lighting off, if safe and visually meaningful;
- same display settings + another approved lighting level.
If only the lighting state changes and the camera artifact changes with it, the lighting system needs separate attention.
Dimming also matters. Different driver and dimming methods can change temporal light output even when the showcase looks equally bright to the eye.
4. Do not choose shutter speed only for the screen
The cleanest display capture is not automatically the best final image. A very fast shutter may reduce motion blur in individual frames but make video motion look unusually sharp or choppy. Sony's movie-recording guidance illustrates why shutter speed must balance flicker control with natural motion rendering.
The working setting therefore has to balance display capture, motion, exposure, frame rate, and the desired production look.
How to Reduce Moiré on a Transparent LCD
If shutter changes have little effect on a fine repeating pattern, stop treating the problem as flicker and test camera geometry instead.
Change camera distance or focal length
Move slightly closer or farther away and reframe. Alternatively, change focal length while keeping approximately the same composition.
If the pattern changes significantly, the sensor is probably sampling the LCD pixel structure at a problematic spatial relationship.
There is no universal "correct distance." A large-format transparent LCD and a compact non-touch transparent LCD should not be assumed to produce the same camera result at the same framing. Panel structure, sensor resolution, lens, crop, recording mode, and subject magnification all matter.
Change the camera angle slightly
A small horizontal or vertical shift can alter the alignment between repeating grids. The camera does not necessarily need to be placed at an obviously oblique angle.
This is especially practical with a movable installation such as a floor-stand transparent LCD display, where the relationship between screen, camera, and shooting position can be adjusted before production.
Test at the actual recording resolution
Do not approve moiré performance only from a scaled camera preview. Inspect the recorded output using the real production settings:
recording resolution;
crop or sensor mode;
intended lens and focal length;
final framing;
recorded file viewed at useful magnification on a full-size monitor.
Nikon similarly recommends checking moiré carefully rather than relying only on a camera's small rear display.
If the production requires both wide video and close-up product stills, validate both. The same display can be clean in a wide shot and develop moiré once its pixel structure occupies a larger proportion of the image.

Build a Camera Test Matrix Before the Shoot
For transparent LCDs used in product launches, exhibitions, retail campaigns, live streams, or social video, a short pre-production matrix is more reliable than specifying one "best" camera setting.
| Test variable | Keep fixed | Observe |
|---|---|---|
| Shutter speed | Camera position, frame rate, lighting, content | Horizontal banding or flicker |
| Frame rate | Camera position, lighting, content | Whether the usable shutter range changes |
| Showcase-light state | Camera and display settings | Whether lighting introduces bands |
| Camera distance | Exposure and display state | Moiré strength |
| Focal length | Display and lighting state | Moiré and framing |
| Camera angle | Distance and exposure | Moiré and perspective |
| Display brightness/configuration | Camera and lighting | Whether a display-state change alters the result |
| Content | Hardware and camera | Exposure pumping or difficult fine patterns |
Hardware configuration should also be recorded precisely. A transparent touch display with a built-in media player may use a different playback path from an externally driven screen, so record the actual source and content configuration rather than only the panel size.
For broader content-source and system-integration considerations, see the guide to smart LCD display integration.

A Five-Minute Shoot-Day Validation
- Load the approved content version.
- Restore the approved display and showcase-light settings.
- Mount the intended camera and lens in the planned position.
- Confirm frame rate, shutter, exposure, shutter mode where relevant, and white balance.
- Record a short clip containing bright and dark content.
- Inspect the recorded file for horizontal bands and brightness variation.
- Record a close or detail shot and check for moiré.
- If camera position or focal length changes significantly, repeat the moiré check.
- Save the working configuration before shooting the final material.
This check becomes especially important when the production crew arrives with a different camera or lens from the equipment used during pre-production.
When the Problem May Be in the Display Installation
Not every camera artifact should be corrected by changing the camera. Escalate the display or installation for technical review when:
- a configuration that was previously clean develops a new artifact without a camera change;
- several different cameras show the same new abnormal behavior;
- banding begins after a display, controller, power, lighting, or configuration change;
- the instability is visible to the human eye as well as the camera;
- one region of the panel behaves differently from the rest;
- the previously approved display configuration cannot be restored;
- a replacement component changes the previously validated camera result.
Transparent LCD procurement and installation specifications can also affect what can be reproduced later. The guide to transparent LCD retail specifications covers broader system-level factors that may not be obvious from a basic panel specification.
If you are still deciding whether a transparent display is appropriate for the project rather than diagnosing an installed unit, the comparison of clear LCD screens and traditional retail displays provides additional application context.
What to Record as the Approved Camera Setup
Once you find a clean configuration, record enough information for another production team to reproduce it.
| Item | Record |
|---|---|
| Camera | Make and model |
| Recording mode | Resolution and frame rate |
| Shutter | Speed or shutter angle |
| Shutter mode | Mechanical, electronic, or other applicable setting |
| Exposure | Aperture and ISO |
| Color | White-balance setting |
| Lens | Lens and focal length |
| Position | Approximate distance, height, and angle |
| Display | Exact model and brightness/configuration state |
| Lighting | Showcase-light configuration and dimming level |
| Content | File/version and playback source |
A photograph of the physical setup and camera menu can supplement this record, but it should not replace the written settings.
The Practical Rule
When a transparent LCD looks correct in person but not on camera, avoid labeling every artifact as "screen flicker."
If shutter-speed changes alter broad bands, investigate timing, camera shutter behavior, the display system, and showcase lighting.
If distance, focal length, or angle changes a fine repeating pattern, investigate spatial moiré.
Then validate the final configuration with the actual camera, lens, frame rate, content, lighting, and transparent display that will be used for production. The successful setting belongs to the complete installed system, not to the LCD specification alone.
If camera performance is an important acceptance requirement for a new transparent display project, send the planned camera, frame rate, installation, and content requirements with your inquiry so they can be included in project validation.